Make your RAM go further – Raspberry Pi OS memory optimisation tips
By Lucy Hattersley. Posted

Memory management in Raspberry Pi OS
In issue 164 of Raspberry Pi Official Magazine we have been playing around with the new Raspberry Pi 5 1GB RAM. While the RAM shortage caused by the demands of AI infrastructure is annoying beyond belief, this has been a great chance for us to really get to grips with RAM.
Generating images in Stable Diffusion on a Raspberry Pi with 1GB gave us a good chance to fully explore the RAM setup in Raspberry Pi OS. And we thought we’d share some of our learnings here.
Check out your RAM
There are a few tools you can use to check out the RAM on your Raspberry Pi. Chief amongst these is the one called ‘free’. Boot up your Raspberry Pi and open a terminal window. Now enter:
$ free -h
Here you’ll see two rows, Mem and Swap:
- Mem – Physical RAM inside your computer
- Swap – A swapfile on the storage drive used as virtual RAM
And six columns:
- total – The total amount of memory (physical RAM or swap space).
- used – Memory currently in use by processes and the kernel.
- free – Completely unused memory sitting idle (normally quite low).
- shared – Memory used by temporary file systems (like /dev/shm).
- buff/cache – Memory used for disk buffers and file system cache. Linux uses spare memory to cache files from disk, which speeds things up. This memory can be quickly reclaimed if applications need it. This is why the free memory is typically quite low.
- available – An estimate of how much memory is available for starting new applications without swapping. This includes free memory plus reclaimable cache/buffers. This is more important than the ‘free’ column as an example of readily available memory.
Free gets its information from memproc, which you can view at cat /proc/meminfo if you want to get further under the hood.
Take it to the htop
As we’re not running many applications, we can tell that most of our RAM usage is going to be taken up with running Raspberry Pi OS in GUI mode. We’ll switch to ‘headless’ mode shortly to see how much RAM we can free up, but first let’s take a look at htop.
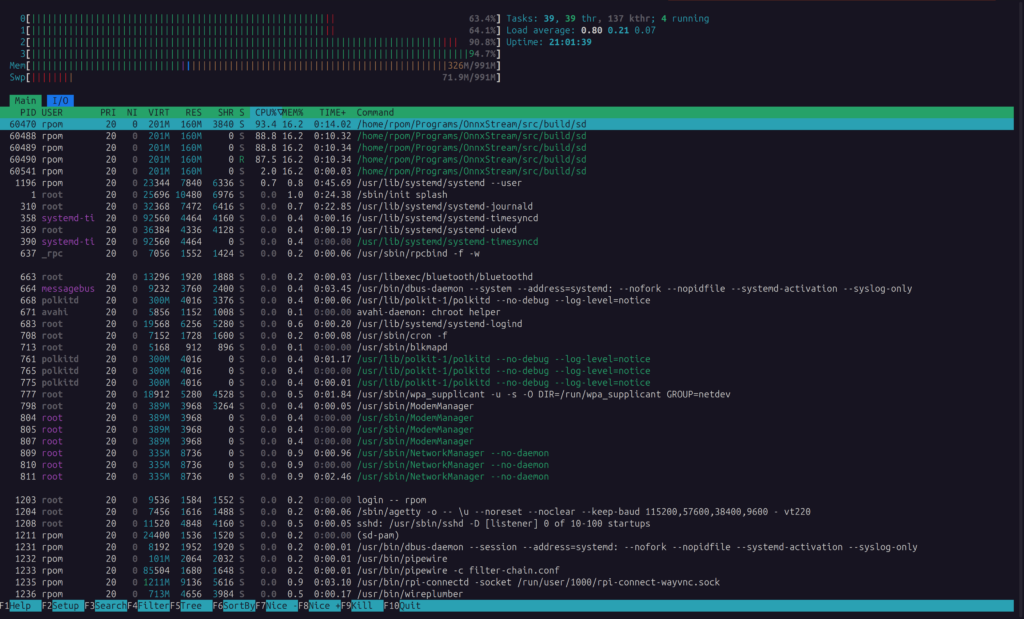
Top (table of processes) is a classic Unix utility that displays information on processes running in real-time on your system. An improved version is called htop (the ‘h’ stands for Hisham Muhammad who developed it) that has colour-coding and mouse support. Htop is installed by default with Raspberry Pi OS. In a terminal window, enter:
$ htop
…to start the program. At the top of the screen is a pseudo-graphical display of the four CPU cores (numbered 0 to 3) and Mem and Swp charts. You should see very little activity in the CPU, but half the Mem bar will display green vertical lines (with the remainder purple, blue, and orange).
Press F1 and you’ll get a help window that explains the colours: green is used, purple is shared, blue is buffer, and orange is cache. Note that colours for the Swp (swap) bar are slightly different. The Help screen also provides a selection of keyboard shortcuts. The two of which that are most useful are P to sort by CPU usage and M to sort by memory usage.
Press any key to return to htop and press SHIFT+M to sort by memory usage. Here we can see that most of the RAM is being taken up by the GUI interface:
- labwc – The Wayland compositor which is Raspberry Pi OS’s GUI window manager.
- Xwayland – A tool to allow X11 display to Wayland.
- wf-panel – The taskbar applications.
- pcmanfm –desktop – The file manager.
If we start to open more programs such as Chromium and Thonny IDE, we will quickly eat up our available RAM. Then we start to move into the swapfile, which uses our physical storage to swap programs in and out of RAM.
Swappiness
While a Raspberry Pi 5 1GB RAM can be used in desktop mode and all applications perform quickly, you’ll quickly run into performance issues if you open multiple applications at once. This is because the desktop interface is taking up a third of your available RAM and – by default – when Raspberry Pi OS uses RAM, it turns to the swapfile. This value is known as ‘swappiness’ and can be investigated with the cat command:
$ cat /proc/sys/vm/swappiness
…which will return 60. This is a moderately aggressive value designed to quickly bring the swapfile into use. We can reduce this swappiness value to protect our microSD card from excessive write actions and prioritise RAM use for faster performance:
$ sudo sysctl vm.swappiness=10
$ cat /proc/sys/vm/swappiness
Note that this change is not permanent and changing the swappiness runs a risk of out of memory errors (OOM). For this reason, we don’t recommend Raspberry Pi 5 1GB RAM for desktop computer use; it’s better to move to a 2GB RAM model (or more) for this intended use case.
However, we really do recommend using Raspberry Pi 5 1GB RAM for electronics and maker projects. Especially if you turn the desktop off and start using the command-line interface.
Going headless
It is clear that we can reclaim a lot of the overhead on our 1GB of RAM by running the computer without the desktop interface. This is known as ‘headless’ mode, although officially it is referred to as booting to the command-line interface (CLI). Press F10 or CTRL+C to exit htop.
There are two ways to switch between the desktop and CLI: using Control Centre and raspi-config. Control Centre is a desktop app, so the inherent advantage of using raspi-config is that you can switch between booting to desktop and CLI mode from the command line. Here is how to switch to the CLI:
- Control Centre: Open Control Centre and choose System from the sidebar. Here you will see the Boot option with ‘To desktop’ and ‘To CLI’ as options. Choose ‘To CLI’ and then click Close. You will need to restart Raspberry Pi to switch from desktop to CLI.
- Raspi-config. Open a terminal and enter
sudo raspi-config. Choose 1 System Options > S5 Boot > B1 Console Text console. Now choose and then at the ‘Would you like to reboot now?’ prompt.
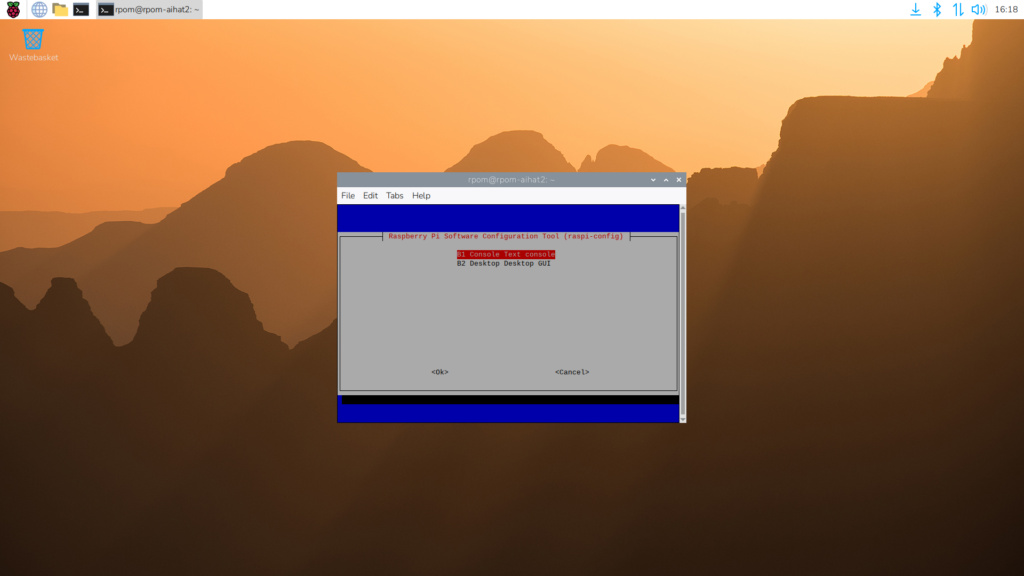
Look mum, no desktop!
You will now boot directly into the command line and be faced with a black screen and flashing cursor. This may be familiar to some computer users who are just getting into their stride, age-wise. But for most of us, the lack of a desktop is unfamiliar territory. Fear not. You don’t need the desktop. Let’s take another look at free:
$ free -h
Now we see that we’re using just 266MB of RAM and have 720MB available on our Raspberry Pi 5 1GB. This is a much more acceptable amount of free RAM for us to start running processes.
Start up htop with:
$ htop
…and we can see much of our system is now free for us to experiment with.
Having just the single interface does lose much of the multitasking functionality inherent in the desktop. But don’t worry because we can have up to six terminals running at once. Press ALT+F2 to swap to our second terminal. Enter your username and password and you can now access the command line from another instance. Press ALT+F1 and ALT+F2 to jump between the two. You can repeat this for ALT+F3, F4, F5, and F6.
If you want to get back to your desktop interface temporarily, enter the command:
$ startx
This will boot up the desktop interface. You can return to the command-line interface by rebooting the system. Use Control Centre or sudo raspi-config to return to the desktop interface on an ongoing basis.

Lucy is Editor of Raspberry Pi Official Magazine.
Subscribe to Raspberry Pi Official Magazine
Save up to 37% off the cover price and get a FREE Raspberry Pi Pico 2 W with a subscription to Raspberry Pi Official Magazine.
More articles

Make a Smart Home in Raspberry Pi Official Magazine issue 167
The dream of smart, connected devices controlling your home automatically, is especialy appealing on a lazy day when we’re trying to get work done in a heatwave. Maybe this will be the year we finally integrate temperature sensors with fans and a drinks dispenser to keep us cool, or maybe not, but we do know […]
Read more →
Win 1 of 3 Pironman 5 Pro Max cases!
Transform your Raspberry Pi with this amazing case
Read more →

Learning to code in an AI age
A new Raspberry Pi Foundation course helps young people learn to code.
Read more →