Can We Hack It? An Electronics Lab Kit
By Les Pounder. Posted
This article was originally published as part of HackSpace magazine, which has since been incorporated into Raspberry Pi Official Magazine.

Chances are that if you are reading HackSpace magazine, then you may have some electronics knowledge, and from that group of people, a large number will have learnt the basics from a kit like this typically bought from Tandy/Radio Shack. This author did – back in the 1980s he had an electronics kit from Argos, which included a crystal radio and made lots of noise! These kits gave us the components to build something fun while secretly learning new skills. So when we happened upon a modern version of these kits, we decided it was time to take one apart and see just how it is built.
Made from a formed thin plastic, the electronics lab can be hacked with hand tools. If using a power drill or rotary tool to cut the plastic, take care as it will crack if too much stress is placed upon it. The top and the bottom of the lab see sections of card used to hide the components from view. The card sections are held in place with small cross-head screws.
On the top left of the lab is a spinning light which is built from a kit in the box. It contains a DC motor with a worm screw attachment and a bright white LED. Coloured reflectors shine the light from the LED as they spin around. At the top of the board are two sections, one for batteries and another for a speaker. Both of these sections can slide out for removal or replacement. Just be careful with the speaker as the wires are attached!
This electronics lab kit is designed for children to create simple projects, and as such, we see a plethora of components such as resistors, reed switch, seven-segment display, LEDs, transistors, speaker, etc. The selection of components is plenty for those starting with electronics. They are held in place on the card, and this reduces the chance of them being lost or ingested.
So how can we make something using this electronics lab kit? There are a series of springs around the board, and these springs are connected to the components under the card layer using a mixture of friction fit, solder, and hot glue. By leaning the spring to one side, we can insert a single-core jumper wire into the spring and use that to connect the components, as per the instruction manual which comes with 50 experiments.
Power is supplied by 2 × AA batteries, providing a nice, safe 3 V for experiments including the motor and LEDs. If using rechargeable batteries, note that the rotating LEDs will not work if used with the motor!


HACKABILITY
This is so hackable! OK, this might not be something to add to your cosplay, or provide massive 'bang for your bucks' project enhancement. But what we can do with this kit is add an Arduino, micro:bit, or Raspberry Pi and use a little coding to enhance the learning offered by the board.
For example, we connected up a micro:bit using 4tronix’s Bit:170 breakout board. This gave us access to all the GPIO pins of the micro:bit using a breadboard format. The jumper wires which came with the electronics kit fit perfectly into Bit:170, and with some MicroPython code written using the excellent Mu editor, we managed to flash the large, yellow LED. With that test successful, we moved on to control the motor via an NPN transistor whose collector and emitter was connected to the VCC side of the battery and the + terminal of the motor. By turning the base pin on via a resistor connected to a pin on the micro:bit, we could start and stop the motor with ease.

Using the electronics lab kit with micro:bit was very straightforward thanks to Bit:170; in fact, the board fitted neatly into the space where the batteries were housed.
Can we hack this any more? Yes! We can add our own components, requiring only that we carefully make space for the parts, and add springs which can be found cheaply online. So, we could add a NeoPixel LED to replace the RGB flashing LED, an OLED screen, or simple components such as capacitors. We can add anything we desire!
If we wish to take the hacks even further, we could integrate a Raspberry Pi Zero in USB gadget mode into the kit, and then code the GPIO and electronics via another computer.
The purpose of this kit is to inspire the next generation of makers, hackers, and tinkerers to learn a new skill and make cool projects. On its own, it can do this, but by adding a microcontroller/ microcomputer we can take this to the next level. Learning to code and learning electronics in one simple package is now possible for less than £30!

Les Pounder is a maker and author who works with the Raspberry Pi Foundation to deliver Picademy. He also helps teachers/learners to become creative technologists.
Subscribe to Raspberry Pi Official Magazine
Save up to 37% off the cover price and get a FREE Raspberry Pi Pico 2 W with a subscription to Raspberry Pi Official Magazine.
More articles
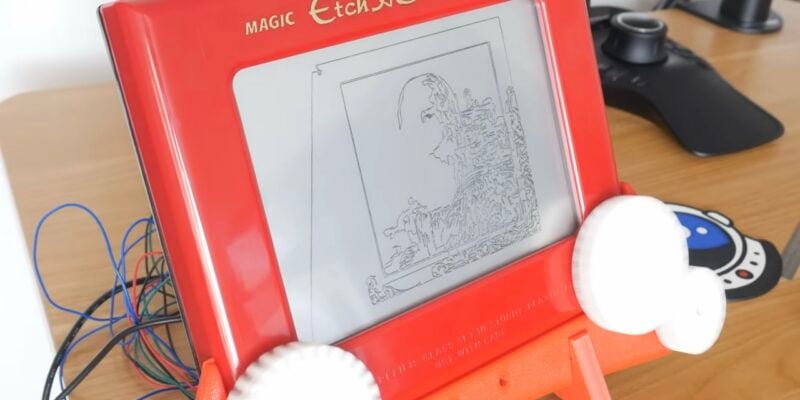
Etch A Sketch CNC machine
The software controlling the Etch A Sketch logs the image, turns it into vectors, turns the vectors into G-code, then sends the G-code to the Etch A Sketch – and it was all written by AI
Read more →

Vintage Radio Plex Server
There’s an antenna sticking up on this build, but it’s just for show
Read more →

Cyber Pet Tumbler
This virtual pet can be thrown around its plastic case. Rob Zwetsloot tries to keep it alive
Read more →