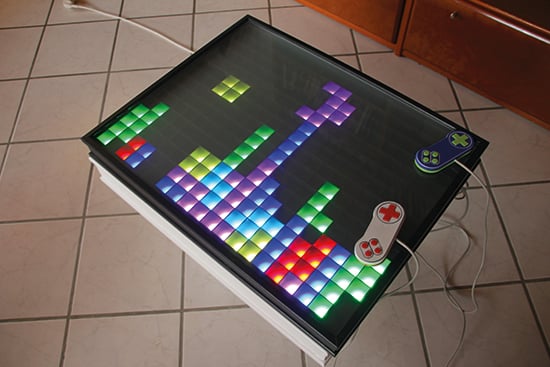
LED-Matrix Table
By Lucy Hattersley. Posted
Program a robot arm, with Raspberry Pi and Python code
Created by Andreas Rottach, the LED Matrix Table is merely the latest in a line of LED matrix tables to put a Raspberry Pi at its heart. But few look as amazing and well built, helping it to stand out just as much as the gorgeous coloured pixel blocks that make up the display. “Many of these LED tables are used for static animation,” says Andreas, “whereas I wanted to focus more on an interactive interface.”
Many coffee-table books have been written about video games, but one thing’s for sure: you wouldn’t put any of them on this beautiful creation. Neither for that matter would you lay down a cup or a pizza box. After all, you wouldn’t want them getting in the way of the retro-inspired action that plays out across its surface.

LED Matrix Table: Creating classics
Andreas admits he did not plan his project too much. “I just looked for common LED strips and their size and I decided to use a few of these to make it cheap and less wasteful, building the table with that number of LEDs in mind,” he tells us. The thought, however, was that the table could play a host of classic games. “My first ideas were Pong, Snake, and Tetris” he says. It was then that he enlisted the help of his father.
“My dad focused on building the actual wooden table because I’m not that good at woodwork, but I designed and 3D-printed the matrix grid to keep the pixels sharp and rectangular.” The grid, designed to have segments of 3×4 pixels each, was created to overlay the LED matrix and prevent colours from one cell mixing with another. It took more than 70 hours to print, but it was able to work with a strip of 300 LEDs.
“I used WS2812B LED strips because they are inexpensive and can be powered with a 5 volt power supply,” explains Andreas. “They have a single data wine which is used to set the colour for each individual LED. I cut them into segments of 15 LEDs and chained the data wire from start to end. Each LED processes a bit of the incoming data and transmits the remaining data to the next LED in the chain.”
Exerting control
Rather than control each LED individually, Andreas bought a dedicated LED controller. This distributes the RGB colour values on the individual LEDs. The actual image data, however, is generated by software running on the Raspberry Pi. Most of the build time was dedicated to coding this, with Andreas switching from Python to C++ to enhance the performance.
He also used open-source tools such as SDL for image and audio support, and CMake for building the project software. “I tried to make the software flexible and it is inspired by patterns of game engines for computers. It always runs through the loop: get events, process events, render image.”
As time went on, Andreas implemented games of Minesweeper, Conway’s Game of Life, and Flappy Bird. He also created a chess-board mode and a clock, and he worked on producing some retro-inspired controllers, although two players can also use a USB keyboard. “It should be very easy to implement any kind of game or visualisation with very little effort,” he concludes. “As for the future, I’d love to include a touch interface and maybe have circular outgoing waves when you put down a glass!”
Step-01: Arranging the LEDs
The WS2812B LED strips have three connections (for 5 V, ground, and data). Laid out in a zigzag pattern, microcontrollers in each LED process incoming data and pass the remaining data to the next LED.

Step-02: Laying the grid
This 3D-printed grid overlays the LED matrix. It forms a flat grid with a resolution of 15×20 pixels, preventing colour bleed. An LED controller is connected to one end of the LED matrix.

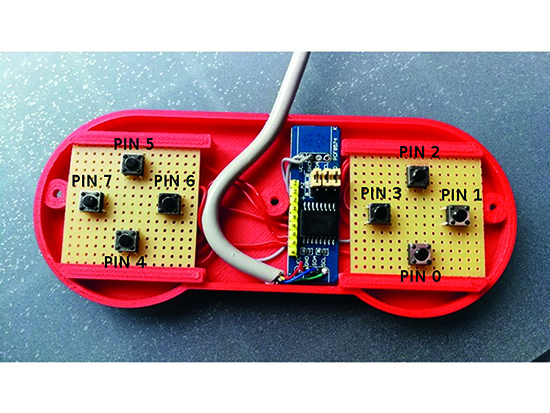
Step-03: Exerting control
Andreas based his 3D-printed controller design on SNES gamepads, using simple I2C port extenders plugged directly into the Pi’s GPIO pins as the control chip. They allowed him eight buttons.

Lucy is Editor of Raspberry Pi Official Magazine.
Subscribe to Raspberry Pi Official Magazine
Save up to 37% off the cover price and get a FREE Raspberry Pi Pico 2 W with a subscription to Raspberry Pi Official Magazine.
More articles

Kuensa portable music sequencer
We like the look of where this device is going.
Read more →

Cyberdeck
We can’t imagine the looks you’d get using this machine on your daily commute, but apparently the maker of this wonderful machine does just that.
Read more →
Programming station
Spot the microcontroller: we can see an Arduino Uno, Arduino Nano, a pair of ESP32 boards, and a Raspberry Pi Pico, all waiting to be played with.
Read more →