Adafruit 1.3″ Color TFT Bonnet
By Lucy Hattersley. Posted

At first glance, the Adafruit 1.3″ Color TFT Bonnet for Raspberry Pi reminded us of a classic tiny games console. A tiny 33 mm (1.3-inch) 240×240 display is framed by a five-way joystick on the left and two buttons on the right. The display is an IPS TFT type controlled over SPI.
Our immediate thought went to the old Game Boy Micro, and we considered putting it inside an old Nintendo game controller case and turning it into an ultra-micro games console.
This, it turns out, is a bad idea. As Limor Fried says in the launch video: “I wouldn’t use it for gaming, as it’s very small and not that comfortable.”
Make beautiful beats with the complete Raspberry Pi music production toolkit.
What’s it for?
So, if a device so reminiscent of a classic console isn’t for gaming, what is it for? The Bonnet shares a heritage with Adafruit’s Mini PiTFT. That device features the same square 33 mm display, but has just the two buttons. This Adafruit 1.3″ Color TFT Bonnet comes with the five-way joystick to enable more complex interface interactions (the fifth direction is a push inwards, incidentally).
Like the Mini PiTFT, the Adafruit 1.3″ Color TFT Bonnet also features a Qwiic/STEMMA QT connector for I2C sensors. And this is where things become clearer. You can plug and play Adafruit’s range of STEMMA QT devices, which includes all manner of sensors: magnetometers, temperature, pressure, proximity, and so on.
It is in this area where the Adafruit 1.3″ Color TFT Bonnet comes alive. What we have here isn’t the heart of a portable games console, but an interface for a range of sensor projects. In that spirit, it is something of a shame that the Bonnet covers the entire 40-pin GPIO header, unlike the Mini PiTFT which leaves 16 pins free. But the STEMMA QT connector provides your I/O needs.
Kernel or Python
Setup of the Adafruit 1.3″ Color TFT Bonnet was straightforward, although the linked instructions are for the two-button Adafruit Mini PiTFT.
There are two approaches: use a script to install a kernel module, or use Python and the Pillow library to draw images on the display.
Crucially, you can’t use both techniques at once. This is a shame as the kernel module is faster and, arguably, more fun. But once it’s installed, you can’t move on to using Python.
The kernel method is also more accessible method for beginners. Run a script and you can mirror the Raspbian with Desktop interface on the tiny 1.3-inch display.
It’s fun but wholly impractical. Not quite ready to give up our dream of a teeny console, we attempted to install PICO-8 in this mode and while it did run, the experience was (as Limor claimed) too small.
The kernel installation script also enables you to run Raspberry Pi in a console mode. Text mode is better, if you have very good eyesight, but it’s still lacking an effective use case. According to Adafruit, the Bonnet runs at 15 fps in kernel mode, so it is better suited to simple animations and video (neither of which is fun to watch on such a small display).
This leaves the second, more practical, option. Which is to follow the Python setup guide. This approach is (according to Adafruit) more stable and allows you to write Python code to control the display.
You need to install the Adafruit_Blinka library that provides CircuitPython support in Python. Once up and running, you can follow the tutorials to create your own display interfaces, and there are examples on the site. From here, you will be able to create interfaces that display information, and interact with your range of I2C sensors.
The screen is sharp, and lovely to look at, but it’s so small that it strikes us as a bit fiddly for anything complicated.
Verdict
7/10
We found this a bit of a head-scratcher, and we’d be interested to hear from makers who find it fits their use case. Unless you know exactly what you’re going to make with it, we suggest going for the simpler two-button Adafruit Mini PiTFT.

Lucy is Editor of Raspberry Pi Official Magazine.
Subscribe to Raspberry Pi Official Magazine
Save up to 37% off the cover price and get a FREE Raspberry Pi Pico 2 W with a subscription to Raspberry Pi Official Magazine.
More articles

Meet the new member of the documentation team at Raspberry Pi
Welcome to the team Steve Davies!
Read more →
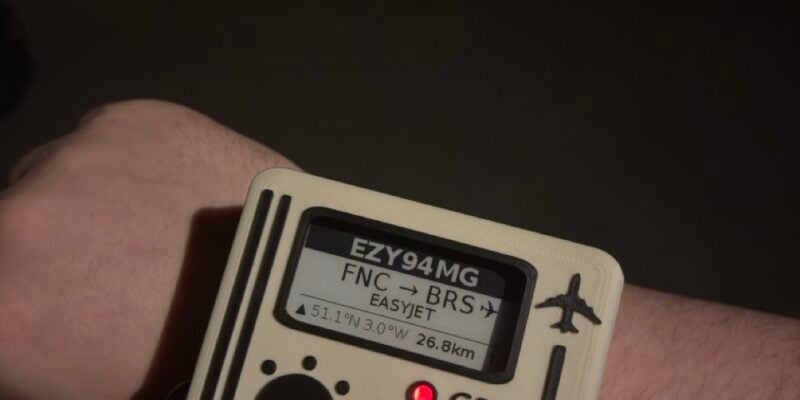
Flight watch
Using Raspberry Pi Zero to figure out what’s flying overhead
Read more →

Mermaid in the shell
Satin and real freshwater pearls complete the look for the mermaid who needs root access in style
Read more →