Raspberry Pine
By PJ Evans. Posted

To many, a broken laptop would be a source of annoyance and hassle, but not Neil Shepherd, who saw nothing but opportunity. After a brief respite at the bottom of his wardrobe, Neil dismantled the laptop looking for useful spares and maybe some inspiration. He hit upon the idea of building a desktop computer that would fit in with the surrounding furniture, rather than being yet another drab black box. “What do you do with a 17-inch LCD panel? Put a frame round it,” he says. “It’s got to be different, so wooden… pine to be precise. Add a Raspberry Pi 3B+ and my love of awful puns gives us Raspberry Pine.”
Make beautiful beats with the complete Raspberry Pi music production toolkit.
Wood-n’t it be nice
The screen is mounted in a custom pine frame and stand. The frame is built using strips of small pine architrave backed by pine strips, offset to give a suitable rebate for the panel to fit and hiding the border. The side supports are modified pine staircase spindles. A Perspex sheet is used to mount the electronics and, when powered, the panel backlight creates a warm glow. Finally, short lengths of foam draft excluder secure the panel sandwiched in the frame.
The LCD panel has a driver board with HDMI, DVI, and VGA inputs. This is connected to the project’s Raspberry Pi 3B+ by a short HDMI lead, with left- and right-handed adapters. This caused a headache for Neil: “I think the biggest challenge was sourcing the LCD panel driver board from a UK supplier on eBay. Unfortunately, the only documentation you get is from the tiny screen printing on the board itself.”
The rest of the electronics supply and manage power. The main supply is the original PSU brick from the donor laptop, providing 19.5 V at 4.5 A. Two DFRobot PSU boards are used to drop the 19.5 V to 5 V for Raspberry Pi, and 12 V for the LCD driver board, enough to power the backlight.

There is also the option of battery power, from three Li-ion cells recovered from another laptop. A battery management system (BMS) board sits on top of it and ensures the cell charge states are balanced. Finally, a charger board provides the correct constant current and voltage charge profile.
A tree-mendous result
The result is a very different take on the classic desktop project: a computer that would look just as at home on the bedroom dressing table as it would in the study. Neil was certainly pleased with the results, as well as an unplanned effect: “The choice of raspberry-coloured Perspex as the support for the electronics produced a pleasant surprise. When powered on, the LCD backlight gives a raspberry glow.”
Regarding planned further refinements, he tells us: “When the Raspberry Pi 4B+ gets the update to boot from USB, there may be a rebuild to refine the layout so the SSD doesn’t stick out the side. Currently, the donor laptop keyboard is being developed with an Arduino Due and more pine. There are thoughts of matching mouse and speakers.”

Subscribe to Raspberry Pi Official Magazine
Save up to 37% off the cover price and get a FREE Raspberry Pi Pico 2 W with a subscription to Raspberry Pi Official Magazine.
More articles
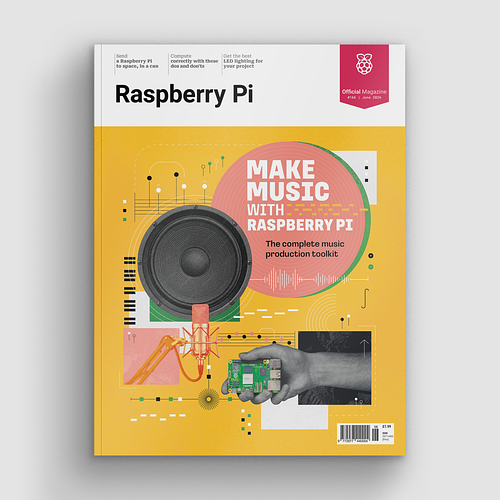
Make Music With Raspberry Pi in Official Raspberry Pi Magazine issue 166
Music production is an esoteric world of chin stroking and arguing over what kind of valve makes the best sound in a guitar amplifier – at least, it can be. Load up on software, bring your friends, and record your latest masterpiece on Raspberry Pi. We bring news from the world of 3D printing, where […]
Read more →

Win one of ten Sixfab AI HAT+
The new add-on could be yours
Read more →
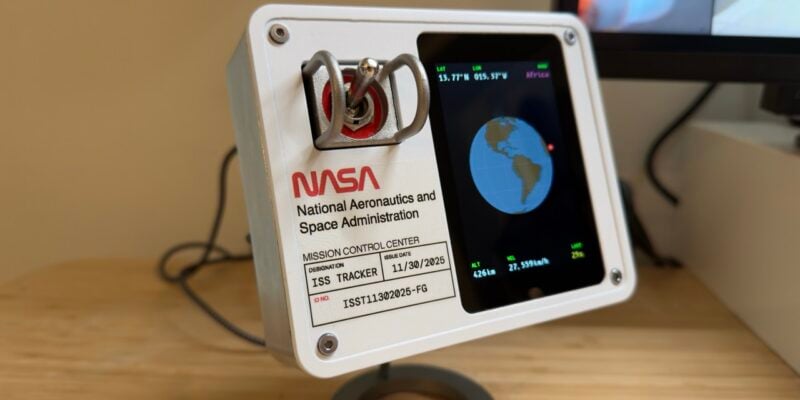
ISS Tracker
Space age is no longer a synonym for futuristic; space age means things that originated in the last millennium.
Read more →