DNA Gel Imager project showcase
By Rosemary Hattersley. Posted

Many of us are intrigued about our ancestry, with DNA testing kits showing how we fit in. Rosie Hattersley learns about a Raspberry Pi DNA imaging setup used for genetic research on plants
Take back control of your online data, with Raspberry Pi.
Research labs and hospitals use multimillion-pound equipment for detailed DNA tests, but when part of the kit goes wrong, a low-cost alternative may be urgently needed. Dr Lindsay Clark found herself in exactly this situation when the gel imager she relied on to expose DNA samples broke down.

The machine that broke down was another lab’s imaging equipment, and “carrying somewhat hazardous ethidium bromide gel from place to place” had never been ideal.
While we mainly think of DNA as useful for catching criminals and identifying possible blood relatives using ancestry testing kits, its main use is for genetic research. Cystic fibrosis researchers use it to test for patterns in DNA clusters, for example (see magpi.cc/Cmkj9F).

Dr Lindsay Clark holds a PhD in Genetics. She studies DNA information about plants, animals, and microbes. Her work on plant genetics focuses on environmental and agricultural issues.
In all cases, the DNA material extracted needs to be visualised and, in this case, Lindsay needed her own replacement imager, fast.
As a Raspberry Pi enthusiast, and Python and R programmer, she soon came up with a plan. Lindsay's interest in Raspberry Pi began when she and her husband wanted a webcam that wouldn’t steal their data. Despite scant knowledge of optics, some online research soon gave her all the details she needed.
Sizing things up
“A typical gel imaging system costs tens of thousands of dollars, but it is essentially a camera mounted over a transilluminator, attached to a computer for taking digital images,” she explains. “We had a transilluminator we’d inherited from an emeritus professor. The only components left then were a camera and a computer, which could be done very cheaply with a Raspberry Pi.” Since Raspberry Pi uses an HDMI output, she also needed an HDMI to DVI converter costing a princely $8.
“We needed to be able to take close-up, reasonably focused images of an orange-fluorescing compound, filtering out other wavelengths of light. The images didn’t need to be publication quality (we could always use another lab’s transilluminator if we really needed to), but they needed to be good enough for us to document approximate DNA fragment sizes.”

Optical collusion
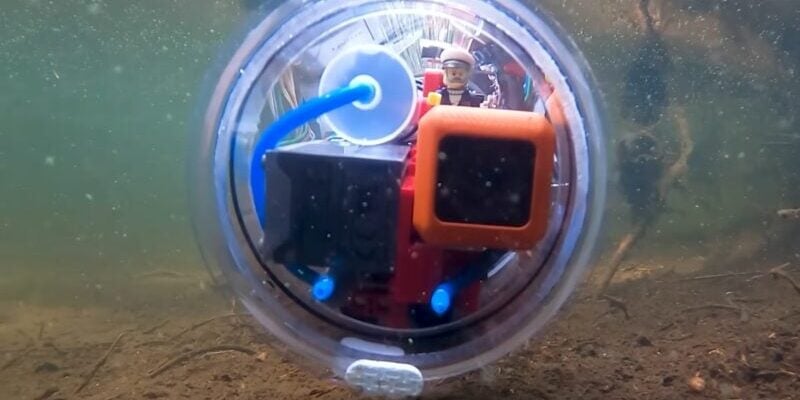
Lindsay first set up her Raspberry Pi 3B camera kit with a fresh Raspbian installation. The only software needed was the standard raspistill command, so she didn’t need to write any custom code. The +2.00 lens used came from an old pair of spectacles. (A stronger lens may have worked even better, she thinks.)
Lindsay then added a lens filter which she bought cheaply online. This was simply to cut out any glare from the transilluminator lamp. The whole setup was housed in a cut-up Styrofoam box. In all, the device cost $150 including the Raspberry Pi 3 and Camera Module, monitor, keyboard, and mouse.
“The biggest challenge was making sure that it could focus on the gel up close,” recalls Lindsay; it can focus from 1 m to infinity. “I tested it out by holding the reading glasses in front of the camera and taking pictures of some flyers.” The imager she’s built can’t zoom or focus but, as she says, “the camera is positioned such that it can get a decent picture of any gel.”
Such has been the project’s success, Lindsay’s colleagues without any Raspberry Pi knowledge have easily made use of it too. She taped instructions on the wall explaining how to trigger the camera using Raspbian, but rarely has anyone asked how to use her DIY setup.
She also encourages others to create their own bespoke equipment. “There’s a great tradition of scientists building their own equipment. Don’t let the existence of a commercial version deter you from building your own!”

Warning
However, Lindsay warns, “Ethidium bromide is a carcinogen, not to mention that a lot of specialised equipment and reagents are needed to get DNA to the point where it could be visualised with my little imager. For example, the most common method of DNA extraction involves using chloroform in a fume hood, and then PCR is typically done after that before visualisation on a gel.”
So the DNA gel imager isn’t something you could easily replicate at home and you should definitely do your research about ethidium bromide. Nonetheless, the idea of using a Raspberry Pi for medical applications has merit.
Making your own imager
1. Set up the Raspberry Pi 3 B Camera Module and install Raspbian. You’ll also need the raspistill command to trigger the Raspberry Pi camera.

2. Cut a hole in the bottom of a Styrofoam box to form an aperture and carve out one seating for the lens filter and a second to hold the glasses lens. Mount the Raspberry Pi camera and secure it in place using paper clips or other adjustable fastening. Lindsay found the gel imager needed to sit 12 inches above the transilluminator, for example.

3. Trace around the camera filter, position one of the lenses in the middle of where the filter was, then trace around the reading glasses. Connect the Raspberry Pi and Camera Module and place the camera over the lens.

Quick facts
-
Lindsay and her husband bought Raspberry Pi boards as anniversary gifts
-
She publishes open-source software for the genetics community
-
She recently built a RetroPie for a friend
-
Lindsay loves solving genetics’ real-world logic problems…
-
such as DNA sequence alignments in allopolyploid organisms!

Rosie has worked for consumer tech titles such as PC Advisor, Computeractive, CNET and Macworld and written For Dummies books on using iPads, Androids and tablets
Subscribe to Raspberry Pi Official Magazine
Save up to 37% off the cover price and get a FREE Raspberry Pi Pico 2 W with a subscription to Raspberry Pi Official Magazine.