Make NeoPixel cosplay eyes with Pi
By Russell Barnes. Posted

Create your own powerful eyes for Sans from Undertale, by getting some LEDs and a NeoPixel ring. It’ll be a skele-ton of fun!
Take back control of your online data, with Raspberry Pi.
NeoPixels are amazing, addressable RGB LEDs from Adafruit. You can get them in strips, rings or individually, and create incredible effects with them. However, it’s not always clear how to control them on the Raspberry Pi.
Recently, friend of the mag Mel Nurdin (of Riddlerule Cosplay) expressed an interest in using NeoPixels in a cosplay of theirs. We decided to cut through the information and create a Pi-powered pair of eyes for their costume: skeleton pun-maker and hotdog salesman Sans from last year’s excellent Undertale game. Follow along to make your own Megalovania eyes, or learn how to use NeoPixels in general for your own projects.
The full article can be found in The MagPi 45
You’ll need
First-generation Raspberry Pi (A+, B+, Zero, etc.)
NeoPixel ring
4× AA battery pack, preferably with a switch
4× rechargeable AA batteries
Portable mobile phone power bank
Push button
Various wires and resistors
STEP-01 Prepare your Pi
A Raspberry Pi Zero was used in the final build, so it would fit better within the confines of the costume. Update a version of Raspbian Jessie by going into the terminal and using sudo apt-get update then sudo apt-get upgrade, before installing the software needed for the NeoPixels:
sudo apt-get install build-essential python-dev git scons swig
Now download the library for the NeoPixels:
git clone https://github.com/jgarff/rpi_ws281x.git
cd rpi_ws281x
scons
Finally, we can install the module to the Pi:
cd python
sudo python setup.py install
STEP-02 Wire up the NeoPixel
It’s worth testing this out on a breadboard first, so you can understand the concept of the circuit. Basically, the NeoPixel needs to be powered separately by the four AA batteries, with a data cable coming from a PWM-enabled pin on the Pi to control the LEDs. You don’t need to step up the 3V3 signal from the Pi to do this, so to keep it simple, we’re not. The main thing to remember is that the ground of the NeoPixel needs to be connected to the negative on the battery pack and a ground on the Raspberry Pi. We’ve connected the data pin for the NeoPixel to pin 6 (GPIO 18).
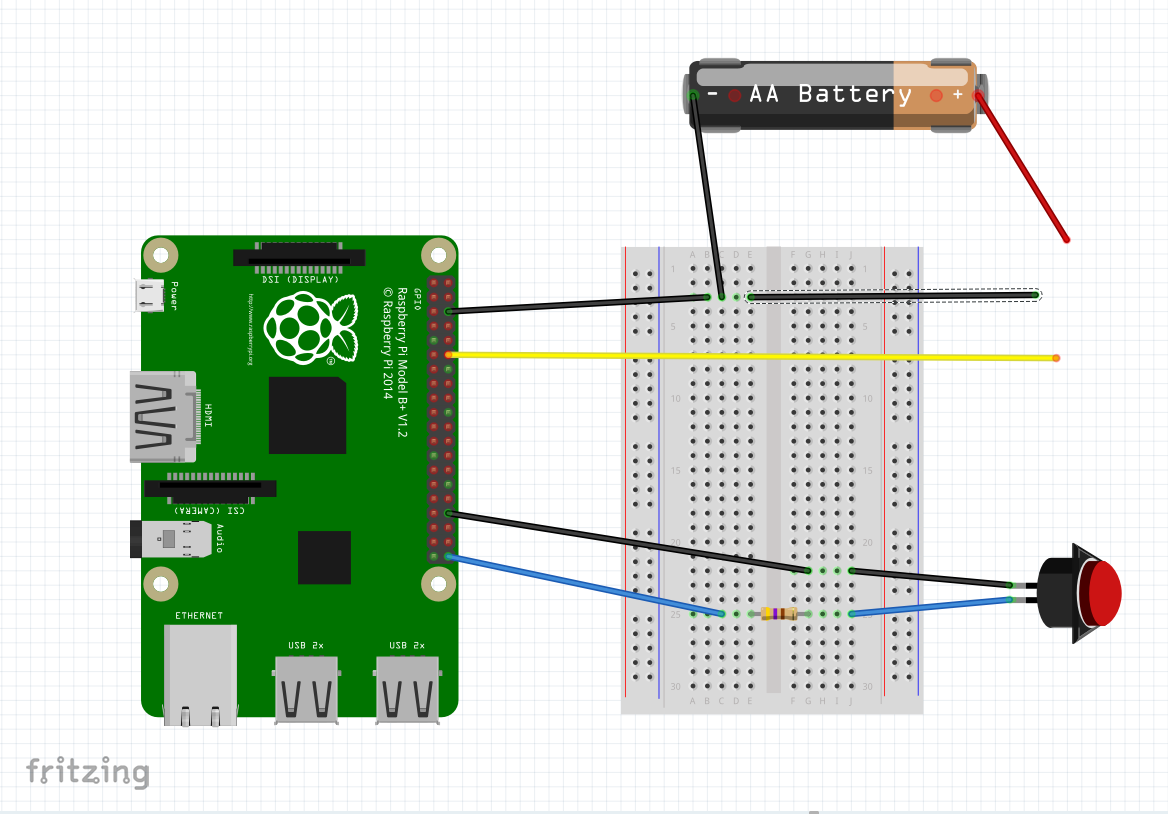
STEP-03 Wire up the button
The button is the easy one to wire up. It doesn’t matter which way around it goes, but we have it connected to pin 40 right at the end and to ground on pin 34, to keep it away from the NeoPixel wires. You’ll also need a resistor suitable for your button – ours uses a 470 ohm resistor – and it can be connected to either side of the button. This is controlled by GPIO Zero, so it’s addressed at GPIO 21 in the code.
STEP-04 Add the code
Type up or download the code to the Raspberry Pi. You can either put it in the home folder or in its own folder; either way, you can test it by running it in the terminal with:
sudo python eyes.py
It should light up the LEDs white for a couple of seconds before turning them off. A button press will make them turn blue, and another button press will make the LEDs flash blue and yellow quite quickly, emulating a specific scenario in the game Undertale. Add this command to the end of the file /etc/profile so it will run on boot.
STEP-05 How the code works
Each NeoPixel in a series can be addressed individually. As the code only needs to have all the lights the same colour at one time, we’ve created a for loop in the main function that goes through and sets each LED to the same colour one by one. We’ve also told the code how many LEDs there are, where they’re connected, and what frequency to use for refreshing them. The rest of the code is fairly straightforward, waiting for button presses and using delays to manage them.
STEP-06 Finishing up
That’s the pure circuit, but how is it used in the costume? Mel installed a ring of frosted acrylic into the skull she made and stuck the NeoPixel ring behind it: this served to diffuse the individual lights into a more coherent ring. Normal white LEDs were mounted in both eye sockets and controlled by a separate switch for the ‘normal’ eyes. The button from the Pi was on a long enough cable that it fit sneakily into her pocket – useful, as the character keeps his hands in them!

Code listing
#!/usr/bin/env python

import time

from gpiozero import Button

from neopixel import *

button = Button(21)

# LED strip configuration:
LED_COUNT   = 16      # Number of LED pixels
LED_PIN     = 18      # GPIO pin
LED_FREQ_HZ = 800000  # LED signal frequency in hertz
LED_DMA     = 5       # DMA channel to use for
# generating signal
#LED_BRIGHTNESS = 255  # LED brightness
LED_INVERT  = False   # True to invert the signal

# Function to control colour change

def Megalovania(strip, color):
    iterations = 0
    for i in range(strip.numPixels()):
        strip.setPixelColor(i, color)
        strip.show()

# Create NeoPixel object with
# appropriate configuration
strip = Adafruit_NeoPixel(LED_COUNT, LED_PIN, LED_FREQ_HZ, LED_DMA, LED_INVERT)
# Initalise the library (must be called once before
# other functions)
strip.begin()

Megalovania(strip, Color(255,255,255))
time.sleep(2)

while True:
    Megalovania(strip, Color(0,0,0)) # Eyes off
    time.sleep(0.5)
    button.wait_for_press()
    Megalovania(strip, Color(0,0,255)) # Blue eye
    time.sleep(0.5)
    button.wait_for_press()
    time.sleep(0.5)
    while button.is_pressed == False:
        Megalovania(strip, Color(255,255,0)) # Yellow eye
        time.sleep(0.1)
        Megalovania(strip, Color(0,0,255)) # Blue eye
        time.sleep(0.1)

Russell runs Raspberry Pi Press, which includes The MagPi, Hello World, HackSpace magazine, and book projects. He’s a massive sci-fi bore.
Subscribe to Raspberry Pi Official Magazine
Save up to 37% off the cover price and get a FREE Raspberry Pi Pico 2 W with a subscription to Raspberry Pi Official Magazine.