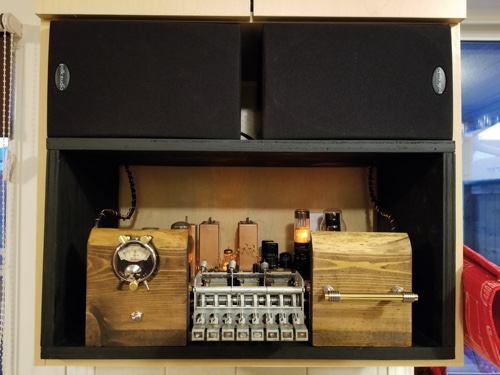
Steampunk Pi Jukebox
By Lucy Hattersley. Posted

Matt Van Gastel’s retro-futuristic Steampunk Pi Jukebox music steaming device looks as good as it sounds
As technology has progressed, so too has the way that we listen to music. We have enjoyed our tunes on vinyl, cassette, CD, and even MiniDisc, among a plethora of formats. We’ve also used MP3 players and iPods and grown accustomed to music streaming.
Yet one method of listening to our favourite songs has remained strong throughout this time: the humble radio, a device that for many conjures images of cosy nights in twiddling AM and FM dials to discover new tunes.
This project first appeared in The MagPi #66. Download a free digital edition of The MagPi #66 here.
Steampunk Pi Jukebox
So when we heard that Matt Van Gastel had turned the main assembly of a 1930s Westinghouse radio receiver into a Pi-powered modern player, it was music to our nostalgic ears. “I’d been carrying this old radio from house to house for years, fully intending to restore it,” he says of the set which his great-grandparents had bought close to a century ago. “But after doing some research and determining that there was no real value in restoring it, I came up with the idea of using a Raspberry Pi to create a music server.”
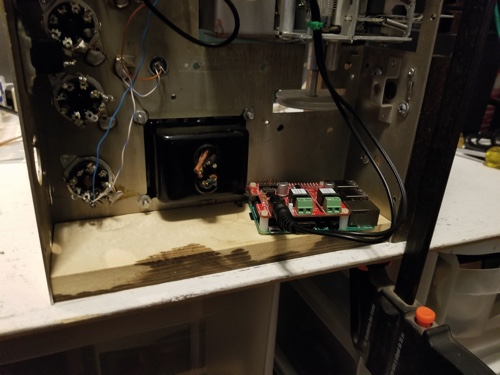
Matt, who has a background in radio and television, began the project by tearing out the innards from the old tube amplifier. “This wasn’t difficult, but it was very messy and time-consuming,” he says. It mostly involved cutting away the various parts including the main electronics assembly. Once he had the assembly, he could turn his attention to his Raspberry Pi 3.
“The Pi 3 seemed like a natural choice because I already had a few of them waiting for a project,” he explains. During his research, he came across the JustBoom Amp HAT which costs £60 and outputs at 55 W. Needing no soldering or external sound cards, and providing high-quality audio along with digital-to-analogue conversion, Matt felt it was perfect.
Serving music on Raspberry Pi
“I had looked at making an actual tube amplifier, but the cost was too high for the quality,” Matt tells us. “But I found the JustBoom site and found this HAT fitted the bill because of its power output capabilities and extremely low noise floor and supply requirements.”
With this in place, Matt then looked for flexible music server software and opted for Mopidy, which is written in Python and allows music to be played from a local disk or through streaming services such as Google Play Music, Spotify, and SoundCloud.
“Mopidy was not my first choice, but I was unable to get the Pi Music Box to integrate with Google,” Matt recalls, citing his music service of choice. “Fortunately, Mopidy worked very well for what I was trying to do. I was able to use Google Music and I found several apps for running Mopidy headless.”
Powering up Steampunk Pi
Matt prepared the case by washing and painting it. He then drilled holes in the original vacuum tubes and wired in amber LEDs to give a glowing, steampunk effect (“that’s my favourite part,” he says). As a neat touch, he wired in a voltage monitor using a 1950s DC voltmeter and placed an LED light behind it. The voltage meter jumps when the unit is turned on. “People comment on the way the needle bounces on the voltmeter upon power-up,” he says.
The build uses power from a 24 V DC brick running at 2.5 A and it makes use of a pair of bookshelf speakers Matt says sound great because of the DAC converter in the JustBoom Amp HAT. “But it’s the aesthetics that people notice first because the unit lives on a shelf in my kitchen. I’ve had lots of positive feedback.”
Step-01 The original radio
As beautiful as the cabinet for this Westinghouse radio looks, Matt said there was little value in restoring it. Instead, he decided to produce a unique piece by basing his build on the main electronics assembly.

Step-02 Dusting it down
Matt needed to get down to the bare chassis. He did this by removing all of the old components, while wearing a respirator, gloves, and safety glasses. He then scrubbed the dust away and dried it thoroughly.

Step-03 Bringing up to scratch
He painted the main assembly with gold, brass, copper, and black. On top of this were fitted the simulated vacuum tubes. He could then build the case, inserting a Pi 3 with a JustBoom Amp HAT fitted.


Lucy is Editor of Raspberry Pi Official Magazine.
Subscribe to Raspberry Pi Official Magazine
Save up to 37% off the cover price and get a FREE Raspberry Pi Pico 2 W with a subscription to Raspberry Pi Official Magazine.
More articles
Make your RAM go further – Raspberry Pi OS memory optimisation tips
In issue 164 of Raspberry Pi Official Magazine we have been playing around with the new Raspberry Pi 5 1GB RAM. While the RAM shortage caused by the demands of AI infrastructure is annoying beyond belief, this has been a great chance for us to really get to grips with RAM. Generating images in Stable […]
Read more →
Mighty Projects – 1GB Computer in Raspberry Pi Official Magazine 164
It’s normal for computers to get faster and more pwerful, but the new-ish Raspberry Pi 5 1GB is a step in the other direction: it has all the processing power and the same GPIO pins of its more costly siblings, but with only 1GB of RAM it’s at a price that’s friendlier on the wallet […]
Read more →

Win one of five 256GB Raspberry Pi Flash Drives
If you’ve been around long enough, you know that every Raspberry Pi accessory is top quality, and the latest Flash Drive is no different. Fancy a big one? We have five up for grabs, and you can enter below… Win 1 of 5 256GB Raspberry Pi Flash Drives
Read more →